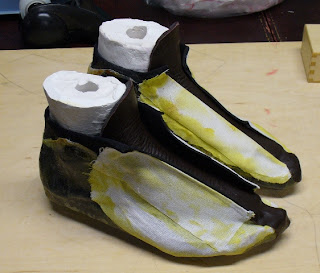

I left off in the previous entry having completed the shell and I added a few layers of dynel fabric as a backing on the exposed portion of the neoprene that will form the upper flaps. The tongue was glued in place having been constructed of EVA foam and leather.

Next, I added the major portion of the leather upper - cowhide of some sort I presume. It came from an old leather jacket made in Argentina. Shown in the photo is one piece of leather glued on with contact cement and held in place with a few rubber bands. Next, but not shown I added a piece of leather around the cuff and then reinforcing strips of leather where the eyelets will be placed. All solidly held in place with contact cement.

Next I painted the shell and the leather. I used acrylic paints from a craft store. They are water based paints that easily apply to leather and the fiberglass shell. The eyelets were something of a challenge. The hand tool shown in the next photo I purchased at a craft store and it punched 5/32 inch holes. The top three holes I added quarter inch eyelets. To create these larger holes I used a hole punch and rubber mallet shown in the next photo. Going through 4 layers of leather, 3 to six of dynel fabric, and one or two of neoprene was a pain - especially the neoprene. Next, time I will use fewer layers in this area.

Here is my list of lessons learned:
- don't fold the neoprene over to form a cuff before laminating the fiber glass on - epoxy gets on the cuff.
- when adding extra padding, which I did around the ankle, taper the edges so that it doesn't show through the fiberglass as the ugly ridge that it does.
- use less gold paint, and more dark paints because they help cover the defects in the shell.
- don't use masking tape for anything, epoxy will soak right through it - plastic tape is much better.
- chopped fiberglass is not an easy filler material to work with.
- I need a real vacuum pump - the mityvac is tough on the hands.
- don't panic when using epoxy - you have more time then you might think.


