Saturday, November 29, 2008

Sugar Plum Short Track Speedskating Boots


My latest project: the sugar plum synthetic snakeskin short track speedskating boots. Without straps or laces they each weighed 280 grams. Update: with laces and straps they each weigh in at 300 grams. The boots are probably about a size 5 or 6. Very stiff sole, not as stiff in the ankle as I wanted, but I am mostly happy with them. The tongue's are 65 durometer EVA foam. That is very hard but how the skater wanted them. One innovation, that I copied from the new Bont Patriot (a new entry level boot, specific for short track) are metal rings on both sides of the boot so that the straps can be easily replaced. Styling is mostly like SS Boots and Marchese, which are the short track boot maker leaders in the USA anyway. The lining is nylon covered neoprene with additional padding a soft EVA foam. Now I just need to find somebody that will pay me to make them boots. It would be nice to have a hobby that paid its own way!

Monday, August 18, 2008

Bike shoes


I recently finished Maddie's custom biking shoes. Here are some specs:
  • three layers of 5.8 oz carbon over five layers of 6 oz fiberglass form the base
  • West system epoxy
  • PVC upper with carbon fiber look
  • two velcro straps
  • a tongue but no eyelets or laces, I am hoping that the straps will be enough
  • 1.5 mm thick neoprene liner with nylon cover
  • extra evalite padding around cuff
  • each shoe weighs in at 247 grams with the SPD cleat attached
Maddie hasn't tested the shoes on a bike yet. Actually, she doesn't have a road or track bike, but she does spin classes at the YMCA a few times a week. Bike shoes, in my opinion, are easier to make than speed boots, or maybe I am just getting better at these projects. The photos look good but the carbon work is full of wrinkles that are mostly covered over. I think that I used too much vacuum and with the fiberglass layers the tendency to wrinkle was increased - another lesson learned.

Thursday, May 22, 2008

Custom Short Track Boots for Maddie


Just finished this new pair of custom ST boots for Maddie. (A newly named jr. category 1 skater BTW.) They turned out as good as can be expected for someone who is just making it up as I go! I used a little bit of Simmons, SS, and Marchese in the design. Dark gray neoprene liner, several layers of carbon fiber + resin epoxy, aluminum, lots of pink glitter and two different materials for the upper outer portions. Velcro, nylon strapping, glues (contact cement and Sumo), some rectangular rings, thread, eyelets and other secret (forgotten) ingredients went into the mix. The sole is as hard as a rock (ie. overbuilt) and the ankle is stiff but not as stiff as Maddie's custom Simmons as seen in this blog's banner photo. The left boot weights in at 348 grams and the right at 360 grams. Not too bad but not as light as the Simmons which are about 60 grams lighter.

When will they see the ice? Not sure. Maddie really doesn't need new boots! This was just a hobby project that burned up a lot of spare hours. If I had to make speed boots for a living I would be a very hungry man. I did learn a lot and if I do it over again I can save time and make a better boot - of that I am sure.

I have to give credit to my wife, Tenley, who did all the sewing on this project, which I kept to an absolute minimum. It was all done on a home machine with regular weight threads, but almost all sewn portions are also held together with Sumo glue so not to worry, nothing is going to let loose anytime soon.

Friday, March 28, 2008

Custom Klingbeil vs. custom carbon fiber


A few more words on the subject of a custom carbon fiber figure skating boot. It is shown in this photo on the right. The left is Maddie's custom Klingbeil boot. Anyway, I tried to make it as traditional looking as possible with some degree of success. The lacing hooks were a bear to install since I was not willing to spend the $300 on the right equipment to set them. The ones I used are large. My supplier sells a smaller version which I purchased but I could not set them at all. I used grommets as eyelets. I need them to help hold the whole boot together! There is almost no real leather in my boot. What you see is marine vinyl. The lining is neoprene with a nylon fabric. The tongue does have a layer of real leather. More on that in a future posting.

Sunday, March 23, 2008

Carbon fiber custom figure skates


I have been busy with a custom boot making project this winter. My daughter, Maddie, is an accomplished short track speedskater, but before she ever took up the sport she was and still is a very accomplished figure skater. As a figure skater she has passed the senior freestyle test, all the gold level ice dances, and of course the senior moves in the field test. In figure skating speak she would be called a triple gold medalist. There is nothing equivalent to this testing system in speedskating. She has excellent equipment for figure skating and skates on custom Klingbeil boots. Klingbeil's are worn by many elite figure skaters including Olympic gold medalists such as Sarah Hughes. They are a leather product and a work of art, but why haven't figure skates evolved as much as speed and hockey boots have over the last 50 or even 100 years? It is hard to say. I don't really know why. If I had to guess I would say that figure skaters are not as bright as speedskaters. (That is a joke!) The Klingbeil boot is much heavier than a speed boot. My daughter's is 824 grams compared to 424 grams for the custom carbon fiber boot I made for her (both without blades attached). Even as a custom boot the Klingbeil doesn't fit as tight as a custom speed boot. By custom, all it really means is that Klingbeil takes several measurements of the feet, molds the footbed with a bio foam and then manufacuture a wooden last for your feet and build a tradition figure skating boot from leather with a steel shank around that last. The Klingbeil workmanship and materials are superior - but the initial fit is so-so and still requires a breakin period. The most amazing thing is that they do this in New York City for about $600. Amazingly cheap compared to custom speed boots most of which are at $1000 and up.

So I put my hand to making her custom figure skating boots with a carbon fiber base and a neoprene liner and padding. The results can be seen in the photo. They are not too bad if I say so myself. They look good and performed well. She took them out on a crowded public session, skated, spun, and eventually completed several double jumps and a couple of double-double combination jumps. Her jumps were high and she said that the boots were very light on her feet. I was pleased although there were a few concerns. First, she wants her boots to be tight and tight they were. But is this what most figure skaters will want? I think she wants them tight because her custom speed boots are tight and she does a lot more speedskating than figure skating these days. She wants them so tight that the feet go numb, and she pulled so hard on the boot hooks that one of them pulled out! So I now plan to modify them to use velcro staps around the cuff so that she can get them really tight!

Friday, November 23, 2007

Adding the upper, painting, and eyelets

The boots have come together and are ready to be tested on the ice. It was a fun and educational experience. Many mistakes were made and hopefully will be avoided next time. But, the blades bolt on and I think that the boots will hold together for sometime.


I left off in the previous entry having completed the shell and I added a few layers of dynel fabric as a backing on the exposed portion of the neoprene that will form the upper flaps. The tongue was glued in place having been constructed of EVA foam and leather.


Next, I added the major portion of the leather upper - cowhide of some sort I presume. It came from an old leather jacket made in Argentina. Shown in the photo is one piece of leather glued on with contact cement and held in place with a few rubber bands. Next, but not shown I added a piece of leather around the cuff and then reinforcing strips of leather where the eyelets will be placed. All solidly held in place with contact cement.


Next I painted the shell and the leather. I used acrylic paints from a craft store. They are water based paints that easily apply to leather and the fiberglass shell. The eyelets were something of a challenge. The hand tool shown in the next photo I purchased at a craft store and it punched 5/32 inch holes. The top three holes I added quarter inch eyelets. To create these larger holes I used a hole punch and rubber mallet shown in the next photo. Going through 4 layers of leather, 3 to six of dynel fabric, and one or two of neoprene was a pain - especially the neoprene. Next, time I will use fewer layers in this area.


Here is my list of lessons learned:
  • don't fold the neoprene over to form a cuff before laminating the fiber glass on - epoxy gets on the cuff.
  • when adding extra padding, which I did around the ankle, taper the edges so that it doesn't show through the fiberglass as the ugly ridge that it does.
  • use less gold paint, and more dark paints because they help cover the defects in the shell.
  • don't use masking tape for anything, epoxy will soak right through it - plastic tape is much better.
  • chopped fiberglass is not an easy filler material to work with.
  • I need a real vacuum pump - the mityvac is tough on the hands.
  • don't panic when using epoxy - you have more time then you might think.

Sunday, November 11, 2007

Laminating the fiberglass shell

It's time for another short update. The fiberglass shells have been laminated to the neoprene rubber liner. Shown in the next photo are the major pieces of 6 oz. fiberglass cut and ready to use.

In the right foot I have used five layers to create the footbed. I glued the blocks onto one of the footbed layers and wetted down these layers and let them set. Not shown in the photo is the fact the I placed an inline frame (without wheels) on top in order to get the spacing right. I used chopped up fiberglass mixed with epoxy as a filler material around the blocks. Otherwise when the big layer go over the top an air bubble will form.

The next step was to put the rest of the fiberglass pieces in place, wet them down with epoxy, roll out the air bubbles and then vacuum form in place. To vacuum form I wrapped the wet shell in plastic film (with pin holes poked in it), taped quilted paper towel in place as a breather material, put the whole thing in a 2.5 gallon ziploc plastic bag, inserted a plastic tube, sealed it off, and then applied a vacuum. First with a vacuum cleaner to get the excess air out of the bag and then I switched over to a hand vacuum pump. See the setup in the next photo:

I used a slow setting epoxy so I left the vacuum on for a few hours. the result was mostly satisfactory. There are lots of wrinkles, and ridges in the transition areas from a single to a double layer of neoprene. That is about the worst of it. I will use plastic tape for masking in the future. Masking tape absorbs the wet epoxy and is hard to remove and leaked through in some places. The next photo shows the complete shell. Unlike carbon fiber the fiberglass is almost transparent.

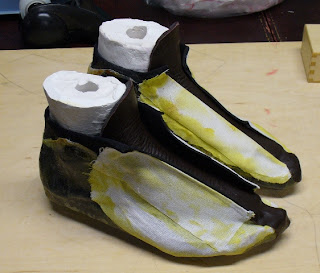
The next photo shows the shell removed from the plaster foot.

Finally, I used contact cement to add some backing/reinforcing material to the neoprene upper. I also have the tongue in place which is a quarter inch layer of EVA foam cemented to a piece of an old leather jacket. More leather to come in my next posting.


Additional photos on my Flickr page.

Monday, October 29, 2007

Neoprene lining/padding for speed boots

The lining is 2 mm black neoprene. One side, the side that is in contact with the skin is a nylon fabric. The basic pattern is shown in the first photo.

The seams were sewed together using a zigzag stitch to form a booty that is pulled over the casting of the foot.

I pulled it tight and stapled it together to hold it in place. Around the cuff I folded the neoprene down and cemented it into place. Around the ankle area I attached an additional layer of neoprene with contact cement. I was hoping to peel the nylon fabric off but it is too solidly attached and was prone to tear the neoprene rubber. I will leave it, even though it will absorb more resin and add to the weight of the boot shell.

Finally, I taped off the portion where the fiberglass will not be resined onto the lining/padding. I decided after this photo was taken to not cut so low in the heel area.

More photos here.

Tuesday, October 16, 2007

Casting the Foot


In my quest to build my own speedskating boots from scratch I need a last pair to build the boots around.

Step 1: Find a victim. Pictured is my 13 year old daughter. I gathered her together with everything I needed: two rolls of plaster gauze (4 by 180 inch roll, about $5 each at Pat Catan's craft store), Vaseline, thin aluminum strip, utility knife, bucket of water, a towel, something for the foot model to sit on, and not shown in any photo - paper towel. I won't go into the process myself because it can be seen in detail in an online video on the Simmons Racing website here. The molds turned out well after drying for a couple of days.

Step 2: Make the foot last. I poured plaster of Paris into the molds and stuck paint roller extension handles in right away as handles. A lesson learned is that plaster of Paris sets very quickly and it is best to mix small batches according to the directions which in my case was two cups of plaster to one cup of water. It is very liquid when first mixed and you might be tempted to think that it is too runny. Not to worry it will set up fast.

Step 3: Remove from the mold by peeling the plaster gauze away. Let them dry some more, sand, patch with plaster, sand some more, and finally I paint them.

More photos of the process can be seen in this Flickr set.

Tuesday, October 9, 2007

Anchorage blocks


It is my goal to make short-track speedskate boots myself from scratch. And the goal of this blog, for the time being, is to document my progress. The thinking is if I let others in on it then I will be less prone to abandon the project. Now before anyone thinks that this is going to be a money making venture let me point out that there are really quite a few companies making speedskating boots. From big guys like Bont that claim to have invented the modern speed boot and manufacture at a Chinese factory, down to apparently one man operations such as SS Boot. That last business is actually for sale, according their website: for $150K you can own the business that made the boots that Apolo Ohno used to earn his last two Olympic metals. Update: The business no longer appears for sale, but has entered a period of limited production - two pairs per month.

So to start I made the anchorage blocks. I never heard them called that before, until I discovered the new SEB skate boot website. Apparently that is what the French call them. I usually refer to them as mounting blocks and they are used to affix the blades to the boots. Shown here are the ones I made this weekend from 6061 aluminum bar stock (1.5 by 1/4 inch). I drilled and tapped the holes for 1/4 inch bolts. Most boot makers use 6 mm bolts, but I could only find SAE taps at Lowes. I have since learned that automotive part stores have metric selections available. I made the first cut with a hacksaw with a fresh blade and was happy with it. The other three cuts I used a hand held jigsaw and a metal cutting blade. That was tricky and not so easy to get a straight cut. I then ground the edges smooth and rounded the corners with a bench grinder. They look okay and should do for now. You can see more photos on my Flickr account.